Thursday, August 23, 2012

Crayon Creativity

Do you ever have those nights where you can't sleep...whether it be from the fire alarm battery being low and chirping every 15 minutes...or your neighbor's dog trying to be your alarm clock?  
Well that was me last...and at about 4:00 AM...I had a great idea!

Back to school sales are still in full swing and I can't turn down a great deal.  
Crayons only costing 25 cents a box demanded me to buy at least twenty...
so now the fun part...finding projects to do with them!


So here's my idea...making crayons into fun beads.
We've all seen the scores of Pinterest posts upcycling crayons into molds...well here's a bit of a twist.


What you'll need for this project is :
crayons
silicone ice cube trays or molds
cans (I clean out ones after I cook with tomato sauce or other canned goods)
straws
utensils to remove hot jars
a pot to boil water


These are two of the molds that I used today...the left one is silicone and is great for making the bead crayons.  The alphabet mold is a soap mold that is great for molding crayons with, 
but too rigid for the bead project.


These are some of my canning utensils and they are great for picking up hot cans of melted wax.  
You can use tongs or pot holders too, but the grippers on these make it extra nice.


One of the things I hate most about making molded crayons is having to peel every little crayon...it takes FOREVER!  Well, I'd like to tell you that I've come up with a way that doesn't need this step!


Just sort the crayons according to their colors and place them in the cans.  
My kids love doing this...it's like a game!


Place the crayon filled cans in a pot with some water in the bottom and turn the heat on.  


I added some Mason jars with water to weight them dow,... it prevents the crayon filled cans from tipping over while the water is boiling.  If you don't want to do it on the stove...it's easy to use a slow cooker to do the same thing...or even put the cans in the oven on low and let the wax melt.  Unfortunately, this process takes a little while, but it's the perfect time to get the molds ready.


Take a plastic straw and cut it so the ends fit snugly against the silicone mold's walls.  
Making sure there is room below and above the straw for wax to flow.  
Repeat in all the cavities so they all have straws in them.  It goes pretty fast.


Once the crayons are melted, pour the wax into the molds.


You can see that all the wax melted out of the crayon wrappers and all that is left is the paper!


Allow the wax molds to cool.  
If my kids are really anxious to get them out I normally pop them in the freezer for a couple minutes.


The crayons should pop right out of the molds.  The ones above are just letters.


But these ones have hole through the center so my kids love to thread them and do all sort of lacing activities with them.  My daughter made a necklace using a shoelace 
and some of her new crayon beads!  

I hope you enjoy as much as we did!


Wednesday, August 22, 2012

Heavenly Blueberry Muffins

Well it's that time of year again when berries are falling off the bushes and just begging us to pick them!   Last weekend we picked blueberries and peaches galore, so I thought I'd share my favorite use for those blueberries....muffins!


A little disclaimer here...if you're looking for super healthy blueberry muffins...you might want to keep looking.  These are absolutely delicious, with tons of flavor...and about as many calories:) 
 But that being said...these really are a must try!

Heavenly Blueberry Muffins

3 cups cake flour
1 Tbsp baking powder
1/2 teaspoon salt
1/4 tsp baking soda
1 1/2 cups melted butter (3 sticks)
1 1/2 cups sugar
2/3 cup milk
1 1/2 teaspoons vanilla extract
4 eggs
1 Tbsp flour
1 Tbsp sugar
2 cups blueberries (frozen are okay too)


First of all sift the 3 cups of cake flour with 1 Tbsp baking powder, 1/2 teaspoon salt, and 1/4 teaspoon baking soda.  Sifting it together ensures that it is well mixed and the flour is light and fluffy.


In a separate bowl, beat together 1 1/2 cups melted butter with 1 1/2 cups of sugar 
until they are airy.  Add the 2/3 cup milk, 1 1/2 teaspoons vanilla, and the 4 eggs. 
Mix well.  


Make sure your berries are cleaned and rid of all their stems.  


Sprinkle the berries with 1 Tbsp flour & 1 Tbsp sugar.  
Toss them to make sure they are all coated and set them aside.


Blend the flour mixture with the butter and sugar mixture until there are no visible lumps.  
Try not to over beat the batter.  Stir in the coated blueberries.


Using a spoon or a large cookie scoop (my favorite) fill the muffin lined pans 2/3 full with batter. 
My daughter requested the flower muffin papers for fun!
Place them in a preheated 350 degree oven for 22-24 minutes.


A little info about cake pans.  If you have a dark colored muffin or cake pan, the edges of your muffins will brown faster than if you have a light/ metallic pan.  So if you're looking for a soft cake or muffin without dark edges...invest in a light pan...Wilton make a great one!


Let the muffins cool and enjoy...the hardest part is only eating one!


Saturday, April 21, 2012

RAINBOW RICE

Rainy day...or break-up in Alaska, making colored rice for the kids to play in is always a great idea!  We've made this a couple of times and worked out the kinks, 
so I thought I'd share!


What you'll need:
a good little helper...mine is picture above :)
a large bag of white rice (we used a 25lbs bag from Costco)
paste or liquid food coloring
gallon Ziploc bags
paper towels
sheet pans
water
a container to play with the rice


First, add 1/2 cup of water in a gallon ziploc bag.  Add about 1/2 teaspoon of food coloring (both paste and liquid work well) and mix it together.


add 6 cups uncooked white rice and seal the Ziploc bag TIGHTLY!


and let your little helper shake shake shake.  I always knead it a little after they are done just to make sure all the rice is good and covered.


It should look like this...all the little pieces covered and sticky!


Cover a sheet pan with a layer of paper towels and spread the colored rice out with your hands.  This step is a bit messy...but it's just food coloring and it washes:)


 Leave the rice on the pan in an open space for about 30 minutes.   
You'll be amazed at how fast it dries! It's the perfect time to work on the next color.
Make sure to rinse out the bag for the next color or use a different bag 
so that colors won't bleed.


Pour all the rice in your chosen container.  We used a shallow rubbermaid tote so the kids could easily play in it...and we could also put the lid on it and put it away!


 And then let your happy little helper play and mix all those colors together!

Hope you enjoy~


Wednesday, April 4, 2012

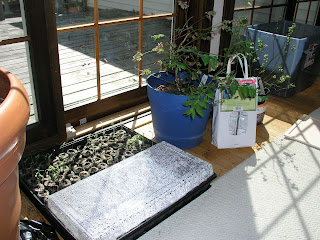
It may still be a bit chilly outside, but things are warm and sprouting inside!  I've started about 140 plants inside, but we have about 5 weeks before most things can safely go in the ground around here!  Every year when I start seeds indoors it makes me smile when I see all the different things sprout and start to grow...it gives you the extra encouragement to know that warm weather is ahead!


My little girl and I picked out a bunch of berry plants that I hope we can plant in a month or so.  We're very excited that we have 5 varieties of blueberries, both black and red raspberries, thornless blackberries, white and purple grapes, and 3 types of strawberries...mmmmmm.


I mostly enjoy growing things that we can eat, but I do like to have a couple of flowers as well! Lavatera are one of my favorites because they're a compact plant with tons of beautiful pink blooms.  I started a full flat of them from the seeds of last years flowers (Thanks Dianne...my wonderful neighbor from Ohio who not only showed me how to do it, but saved the seeds for me!)


And here...yes I know it's a little hick:)...are my potatoes...well the first batch.  I like to start some potatoes early inside in grow bags so that by the 4th of July we have fresh spuds!  The rest of the potatoes will be planted outside...but those first ones are sure great!


This is my daughter helping me get potatoes out of our raised boxes last summer...she was loving hunting for them! Hopefully we'll have as much fun this year too!

Thursday, March 15, 2012

Busy Busy

Well we surely have been busy...especially my husband!  We've been in our home for almost three weeks, and in that time we've started lots of projects (notice I didn't say finish:)  One of the first things our son helped us change was the dangerous stair railing at the top of our staircase. He promptly demonstrated that he could get through it, which led to it being taken down that evening.


We started looking at ideas to remedy the large gaps and we found a fun idea:


So Jeff ran over to Lowes and got lumber and pretty quickly this is now what sits in its place!


It still needs finished and the detail work done on it, but it's great to have a functional barrier!

The other projects we've done or started is replacing a non-functioning green 1970's toilet...


 demolishing part of the kitchen wall ( the new refrigerator wouldn't fit through any doorway to the kitchen--my bad--thankfully we're taking that wall out anyway.)  The delivery guys thought it was rather funny that I took out the doorway and part of the wall so they could get the fridge in place!  


This is gone...and in its place: 


Jeff also replace the nasty dishwasher with a beautiful stainless one that washes dishes beautifully...like I said he's been busy!

Also, the stairs to our basement had no ballasts...not a good thing with two little kids...a 7 foot fall onto concrete needed to be prevented before they could play down here.  
I'm hoping to paint them today so I'll post pictures soon.  


We've ordered carpet and hope to get it in the living room in the next two weeks...and I have lots of paint samples so we can pick just the right color!

I've been unpacking like crazy and redoing the pantry (I'm not a huge fan of particleboard and green ivy contact paper) so I'm doing it in black and white.  


And we've picked out tile for the kitchen floor...and come to find out there is 3 layers on linoleum that we're going to have to take up before we can tile! 


You can look a few pictures back to see the brick looking flooring that is in the kitchen right now:) 

It's fun to get to improve so many things on our house...and I'm very fortunate to have a very handy hubby!  Hopefully I'll be able to post some more finished photos soon!